This post highlights the shortcomings of official EUC apps and spotlights Darknessbot, an iOS app offering great features for electric unicycle riders. Tips include using video overlays, customizing telemetry tiles, mileage tracking, SIRI shortcuts, Apple Watch integration, and ergonomic watch adjustments—all designed to enhance your ride experience and safety. Darknessbot offers both free and paid features.
Video Content
Our content may contain affiliate links. If you purchase a product using our link, we may earn a commission. This does not affect the price you pay, and we do our best to provide accurate information, regardless of affiliate status.


Written Content
The biggest flaw with the major EUC companies is with their app. It is a shame that such great personal electric mobility devices are being held back by the very way we connect and interact with the device. The apps from Gotway and King Song (as of writing this article) are completely worthless. Hopefully this will change, but in the meantime this has led the EUC community to develop 3rd party apps to connect with our EUCs and many of these apps have some very nice features. I love stats and I love to see the numbers during and after each ride. I currently use the Android EUC app called EUC World but for iPhone users, you’ll want to use Darknessbot. The following Darknessbot tips comes from my friend Vache who I’ve gone on group rides with several times in Las Vegas, both on EUCs and Onewheels. I hope you iPhone people find something useful from this article by Vache. After reading this, I’m inclined to switch over to iPhone!😁
Darknessbot EUC iPhone App Tips and Tricks
What’s up everyone? My name is Vache; I’m an EUC and Onewheel rider from Las Vegas and I just wanted to share some Tips and Tricks with you on how I use the Darknessbot and Apple Watch companion apps with my electric unicycle. Darknessbot is a FREE app but it does have some neat *paid features you can unlock. I am not affiliated with the app nor do I get any kick back from sales. You can buy individual features or unlock the Premium (full) version. Details are at the end. That being said; I did buy the full version of the app which was $7.99 and I am very happy with it 😀 So let’s go…Tip 1: Video with Telemetry (“Video Recorder” *)
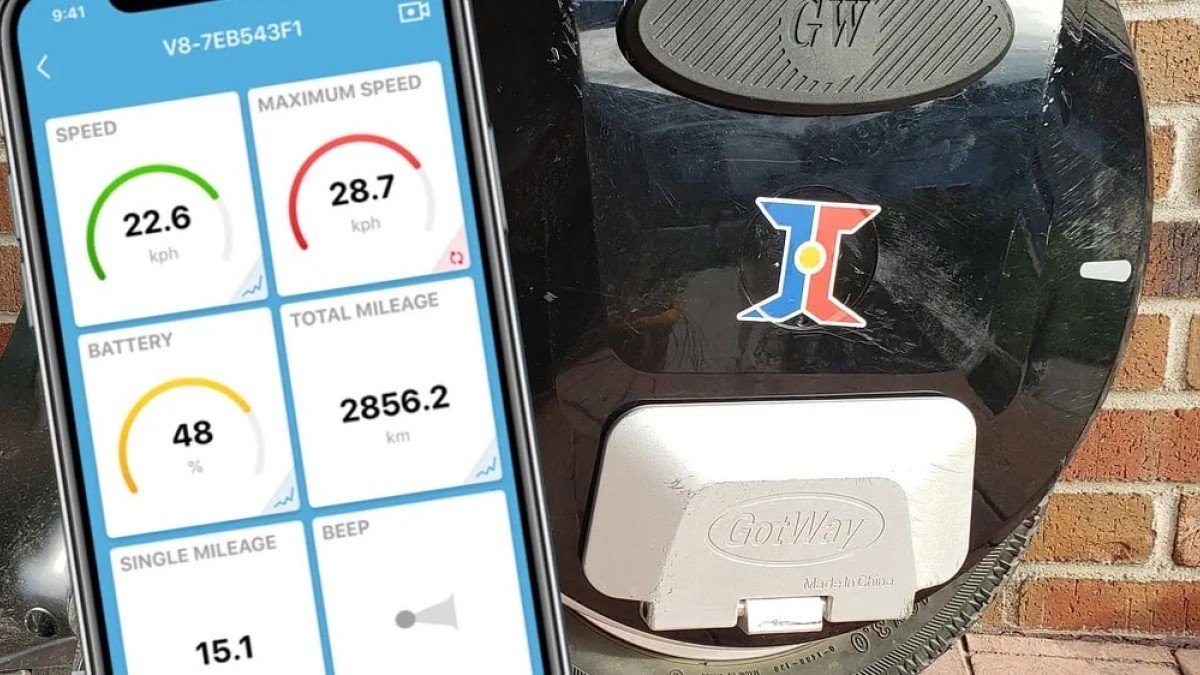
This is a fun feature that allows you to record a video while overlaying real time telemetry information from your electric unicycle. It combines stats and footage all in one!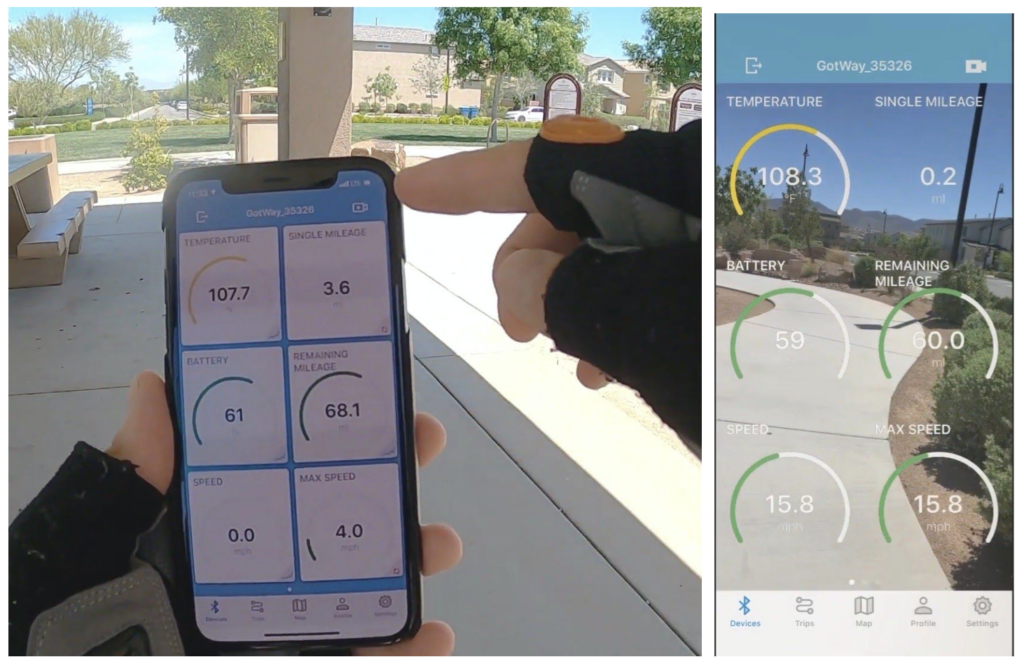 Start the Darknessbot app on your iPhone and Tap on the Video Camera Icon on the top right.
You can choose to record with or without the microphone (audio) which can be useful if you’re making a video that requires real time voice over.
The video screen can get a bit busy with 6 tiles of telemetry information, but I’ll show you how to change that with Tip #2 so keep on reading.
Start the Darknessbot app on your iPhone and Tap on the Video Camera Icon on the top right.
You can choose to record with or without the microphone (audio) which can be useful if you’re making a video that requires real time voice over.
The video screen can get a bit busy with 6 tiles of telemetry information, but I’ll show you how to change that with Tip #2 so keep on reading.
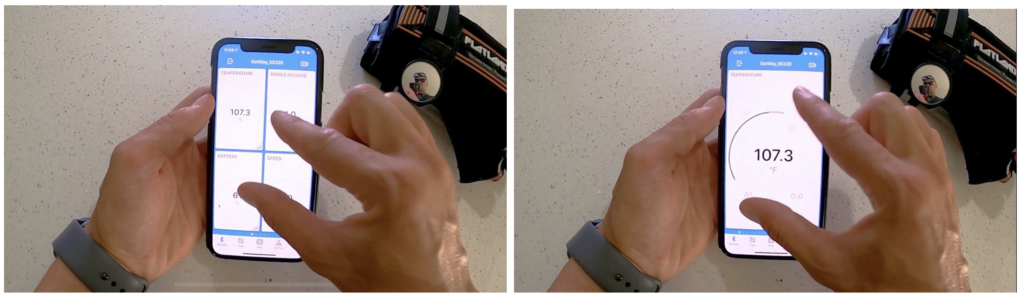
Tip 2: Tile Rearranging and Resizing
This is a great way to customize your main screen and display the necessary information the way you want to see it. To rearrange the tiles on the main page, start by tapping and holding a tile; then dragging and dropping it where you like. You can also move the tile in between pages by sliding it to the edge of the screen to go to the next/previous page.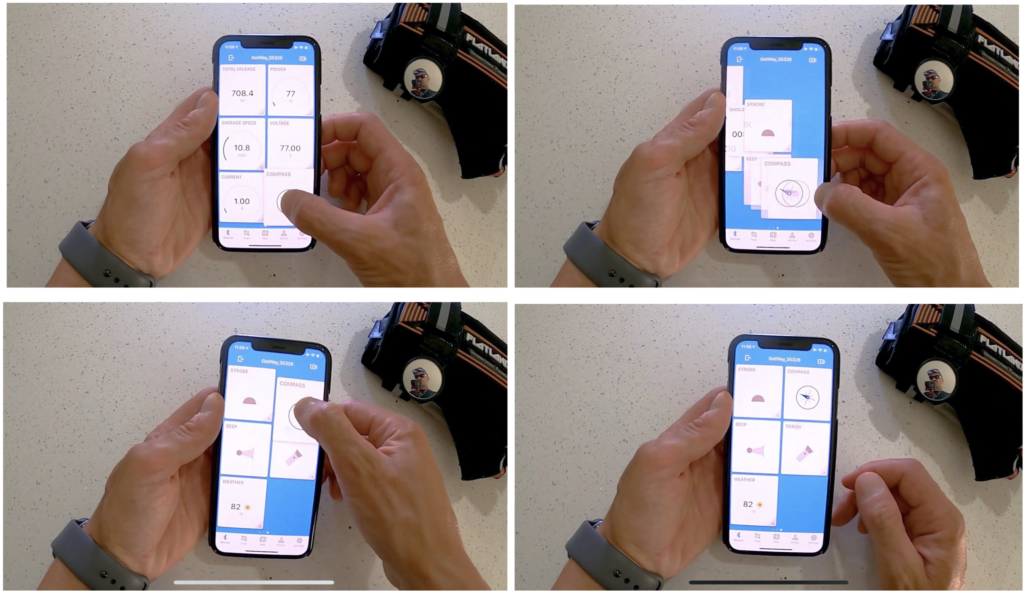 When resizing the tiles you have 3 different page views to choose from:
6 tiles (2×3), 4 tiles (2×2), or just 1 tile (1×1).
To select the different views, simply “Pinch In” and “Pinch Out” from the center of the screen; this is the same gesture you would do to zoom in and out of a photo.
When resizing the tiles you have 3 different page views to choose from:
6 tiles (2×3), 4 tiles (2×2), or just 1 tile (1×1).
To select the different views, simply “Pinch In” and “Pinch Out” from the center of the screen; this is the same gesture you would do to zoom in and out of a photo.
Tip 3: Unknown Trip and Daily Mileage Hack (“Graphs” **paid feature)
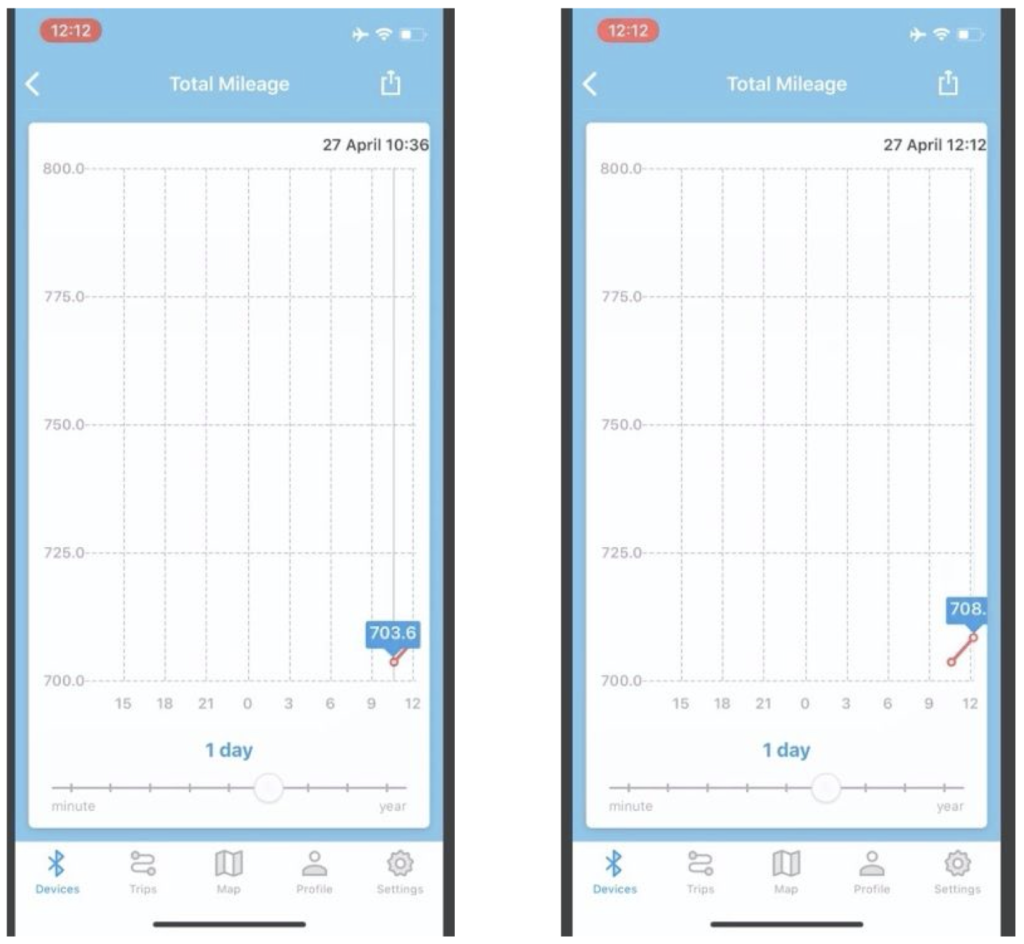
I can’t tell you how many times I’ve started a ride and part way through, realized that I forgot to start the Darknessbot app; and now I don’t know how many miles I’ve ridden. This is a neat hack that uses the timeline feature on the odometer (Total Mileage) to help you figure out how many miles you’ve ridden for the day. Tap the “Total Mileage” tile to see the timeline of your odometer. You can move the slider on the bottom of the graph to see different time frames. Pick a time frame that’s greater than what you’ve been riding already. For example: If you’ve been riding for 15 minutes, then pick either the 30 minute time frame or above (1hr, 2hr, Day, Week, etc…), rather than a 10 minutes time frame.
Slide your finger across the red data points to see each result.
Then simply subtract the previous days total from your current total mileage and that’s your daily mileage so far. (708 – 703 = 5 miles)
For example: If you’ve been riding for 15 minutes, then pick either the 30 minute time frame or above (1hr, 2hr, Day, Week, etc…), rather than a 10 minutes time frame.
Slide your finger across the red data points to see each result.
Then simply subtract the previous days total from your current total mileage and that’s your daily mileage so far. (708 – 703 = 5 miles)
 **This is listed as a partial paid feature because you can use the time frame feature in the free version, but it limits you to only the first few available time frames (I think up to 2 hours).
The timeline feature is on many of the other telemetry data fields as well.
Lots of useful information for all us data geeks.
**This is listed as a partial paid feature because you can use the time frame feature in the free version, but it limits you to only the first few available time frames (I think up to 2 hours).
The timeline feature is on many of the other telemetry data fields as well.
Lots of useful information for all us data geeks.
Tip 4: Offline Mode
If you are not near your wheel or it’s powered off, and you want to get a screenshot of all the data fields right before the wheel was turned off last, then this next tip is for you. Start the Darknessbot app and you’ll notice it just sits there searching for your wheel. On the top left you’ll see an icon that looks like a few hockey pucks stacked on top of each other (database icon). Once you click that you’ll be able to see all the devices that you’ve connected to and view their data in an offline mode environment.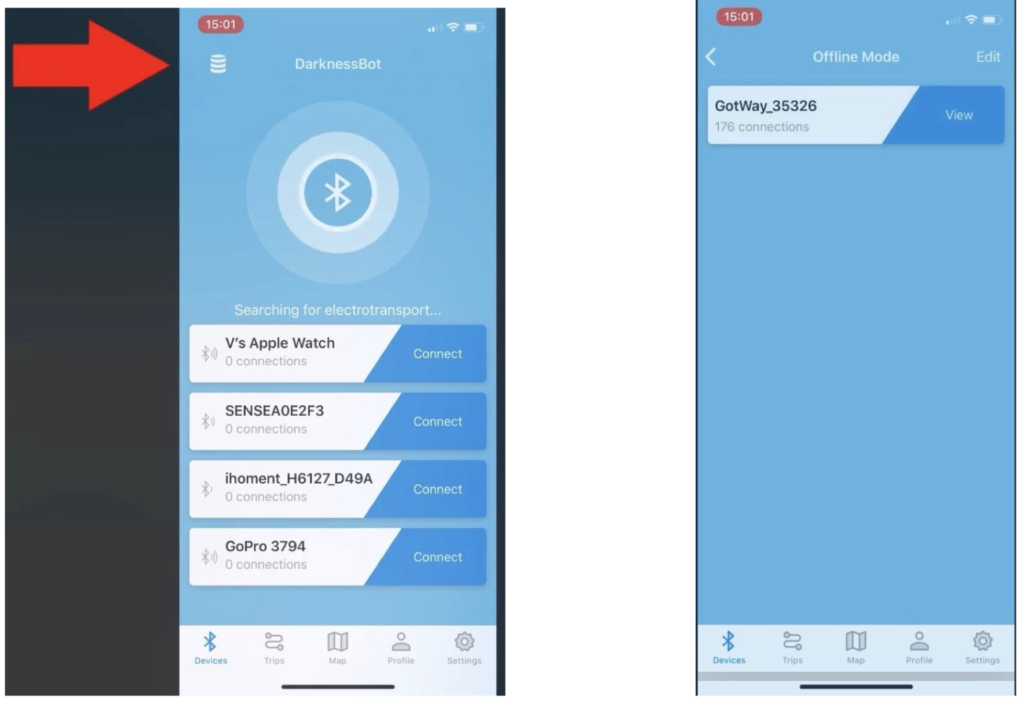
Tip 5: SIRI Shortcuts
I love SIRI and use it everyday for all kinds of things. One of my favorites is using it with my Apple Watch and EUC. You can use SIRI to interact with the Darknessbot app and get some really useful information using either your iPhone or your Apple Watch. To setup the SIRI shortcuts on the iPhone, start the Darknessbot app: Tap Settings > Integration > SIRI Shortcuts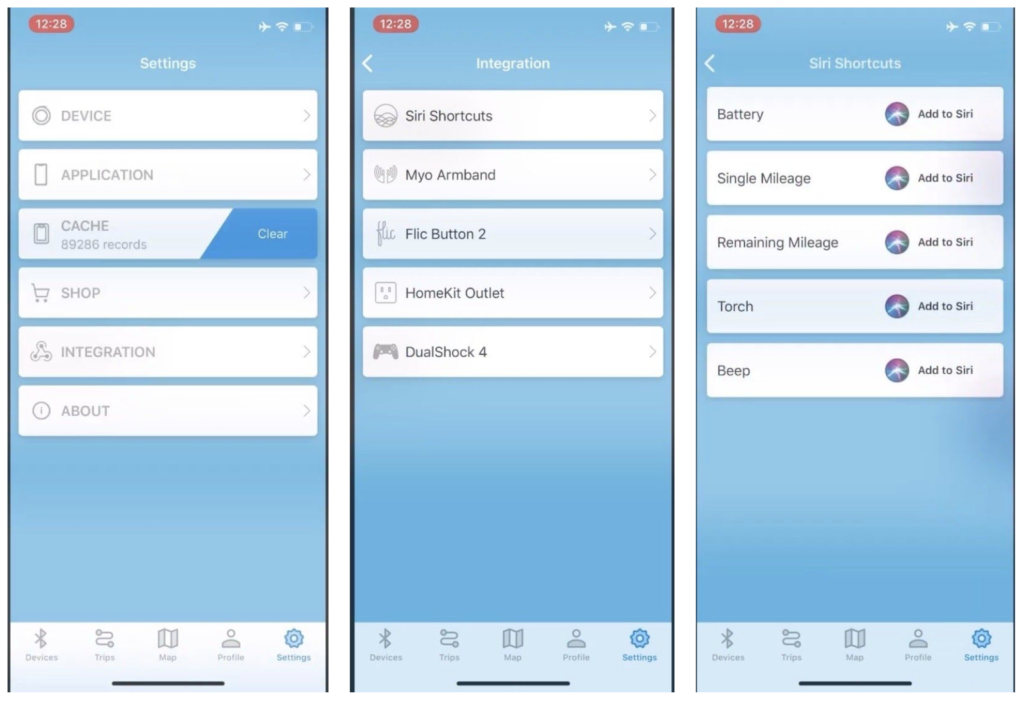 At the moment you have 5 functions available:
“Battery”, “Single Mileage”, “Remaining Mileage”, “Torch”, and “Beep”.
You can customize each function to whatever phrase you want to say so have some fun with it.
I personally only use “Remaining Battery”, “Single Mileage”, and “Beep” as my voice commands.
At the moment you have 5 functions available:
“Battery”, “Single Mileage”, “Remaining Mileage”, “Torch”, and “Beep”.
You can customize each function to whatever phrase you want to say so have some fun with it.
I personally only use “Remaining Battery”, “Single Mileage”, and “Beep” as my voice commands.
Tip 6: SIRI Raise to Speak
This is one of my all time favorite features of the Apple Watch; using SIRI without saying or touching anything. You simply raise your wrist from your side to your mouth and it activates SIRI. Simple as that! This feature is most likely not enabled by default so here is how to switch it on. Start the “Watch” app on your iPhone: Tap My Watch > SIRI > Enable Raise to Speak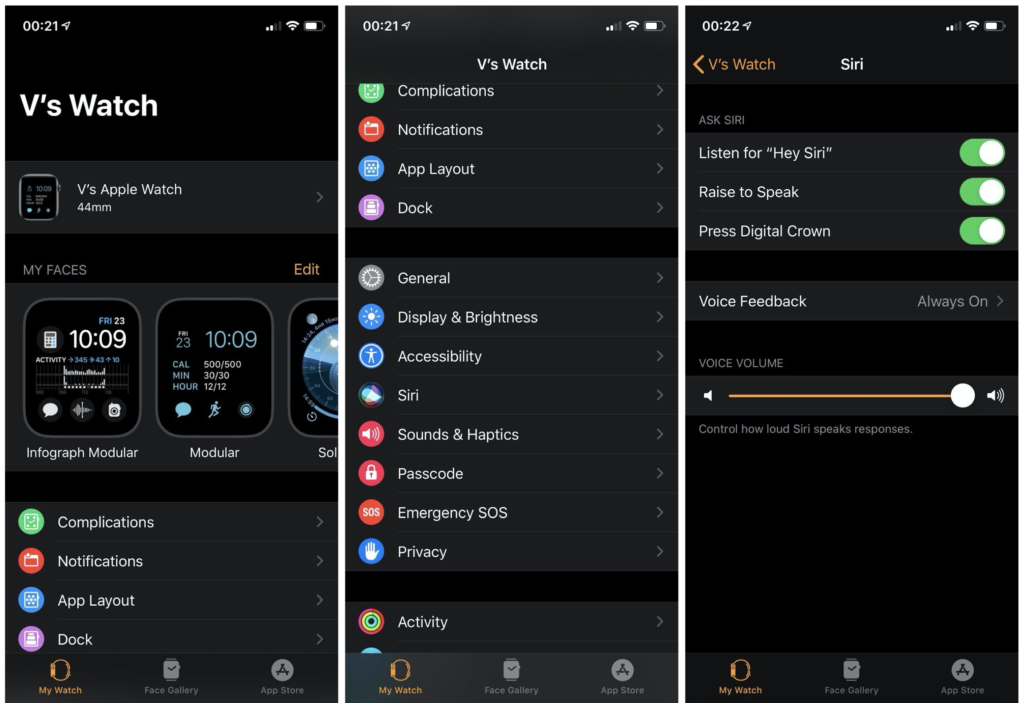 Now all you need to do is raise your wrist and ask SIRI for whatever you want, including the 5 shortcuts you setup in Tip #5.
Tip 7: Beep & Torch – Apple Watch
This is an important one that I use on a daily basis, and a feature found on the Darknessbot Apple Watch companion app.
On the app itself you can swipe through and see information like, Speed, Battery Percentage, Single Mileage, Remaining Mileage, Total Mileage, and Temperature.
Now all you need to do is raise your wrist and ask SIRI for whatever you want, including the 5 shortcuts you setup in Tip #5.
Tip 7: Beep & Torch – Apple Watch
This is an important one that I use on a daily basis, and a feature found on the Darknessbot Apple Watch companion app.
On the app itself you can swipe through and see information like, Speed, Battery Percentage, Single Mileage, Remaining Mileage, Total Mileage, and Temperature.
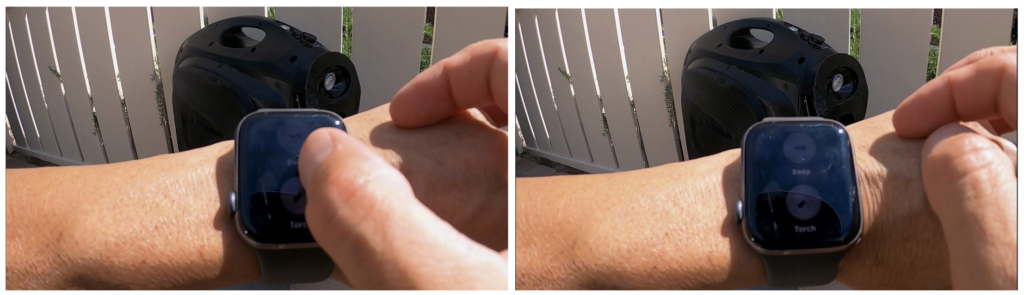
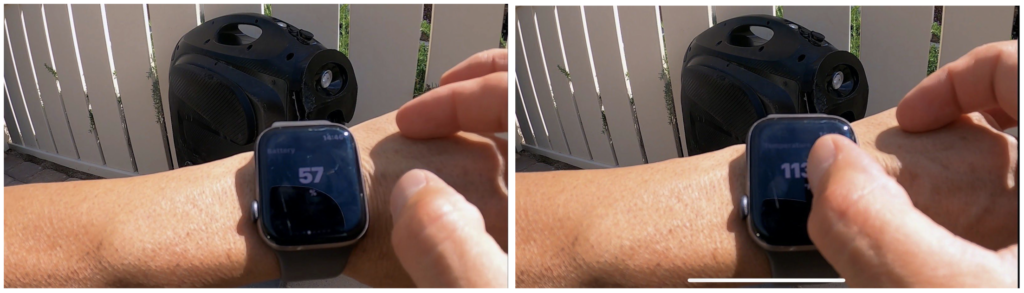 However, if you Tap and Long Press on any of those screens you can either BEEP the horn, or turn ON & OFF your headlight. Both can be very useful features.
I use the BEEP everyday as a bike bell. It’s a very courteous gesture to give a BEEP from a distance. It alerts people of you approaching from behind and helps to prevent from startling them. Be nice to people 🙂
However, if you Tap and Long Press on any of those screens you can either BEEP the horn, or turn ON & OFF your headlight. Both can be very useful features.
I use the BEEP everyday as a bike bell. It’s a very courteous gesture to give a BEEP from a distance. It alerts people of you approaching from behind and helps to prevent from startling them. Be nice to people 🙂
 Be forewarned there is a slight delay between the watch, phone, and EUC so it does force you to look farther ahead and be more preventative with your BEEPS.
Tip 8: Apple Watch Flip Orientation
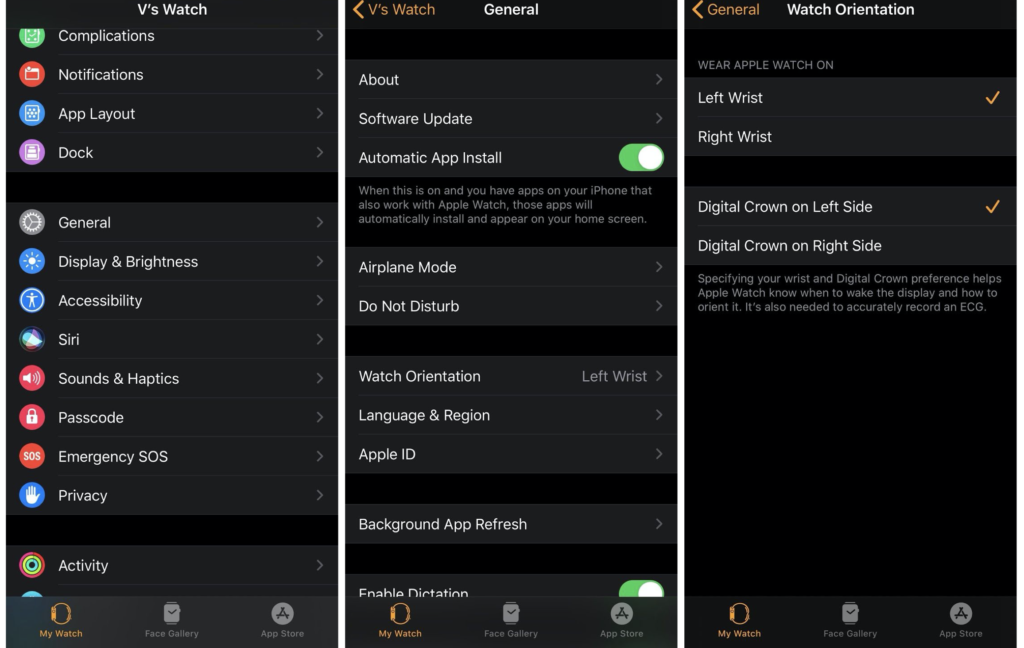
For this next tip I’m going to show you how I wear my Apple Watch and why I do it. Most (right handed) people will traditionally wear their Apple Watch on the left wrist with the Digital Crown being on the Top Right. What I like to do is remove the watch bands and swap their places; so now when you put the watch back on your wrist, the face should be upside down and the Digital Crown should be on the Bottom Left.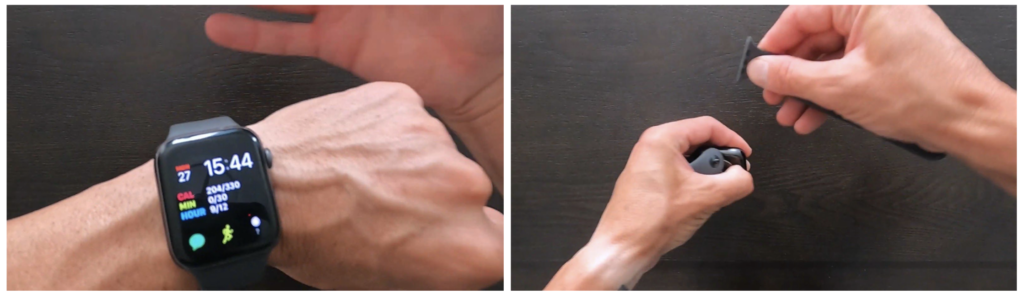 To flip the watch face, open the “Watch” app on your iPhone and
Tap My Watch > General > Watch Orientation > Digital Crown on Left Side
To flip the watch face, open the “Watch” app on your iPhone and
Tap My Watch > General > Watch Orientation > Digital Crown on Left Side
 Now when you look at your watch the orientation should be correct.
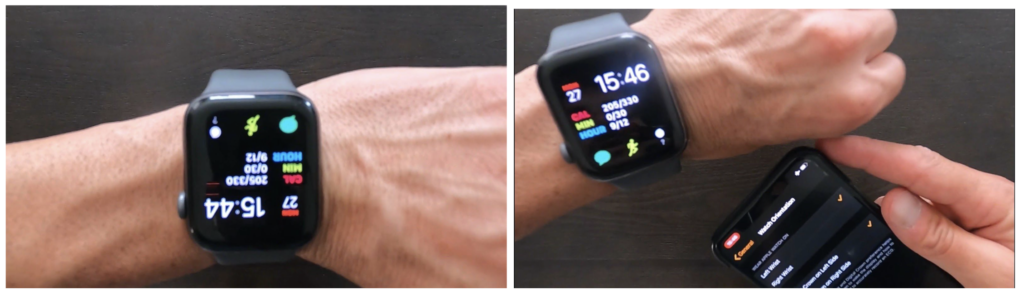 This may take some getting used to but after about a day or two it feels more natural and comfortable to operate the Digital Crown.
This is another one of my favorite Apple Watch tips! Give it a fair chance; you’ll be surprised.
The reason I like to wear my watch this way is to accommodate my riding gloves/wrist protection and also to be able to use the Digital Crown without having to fish my finger, under and behind my glove.
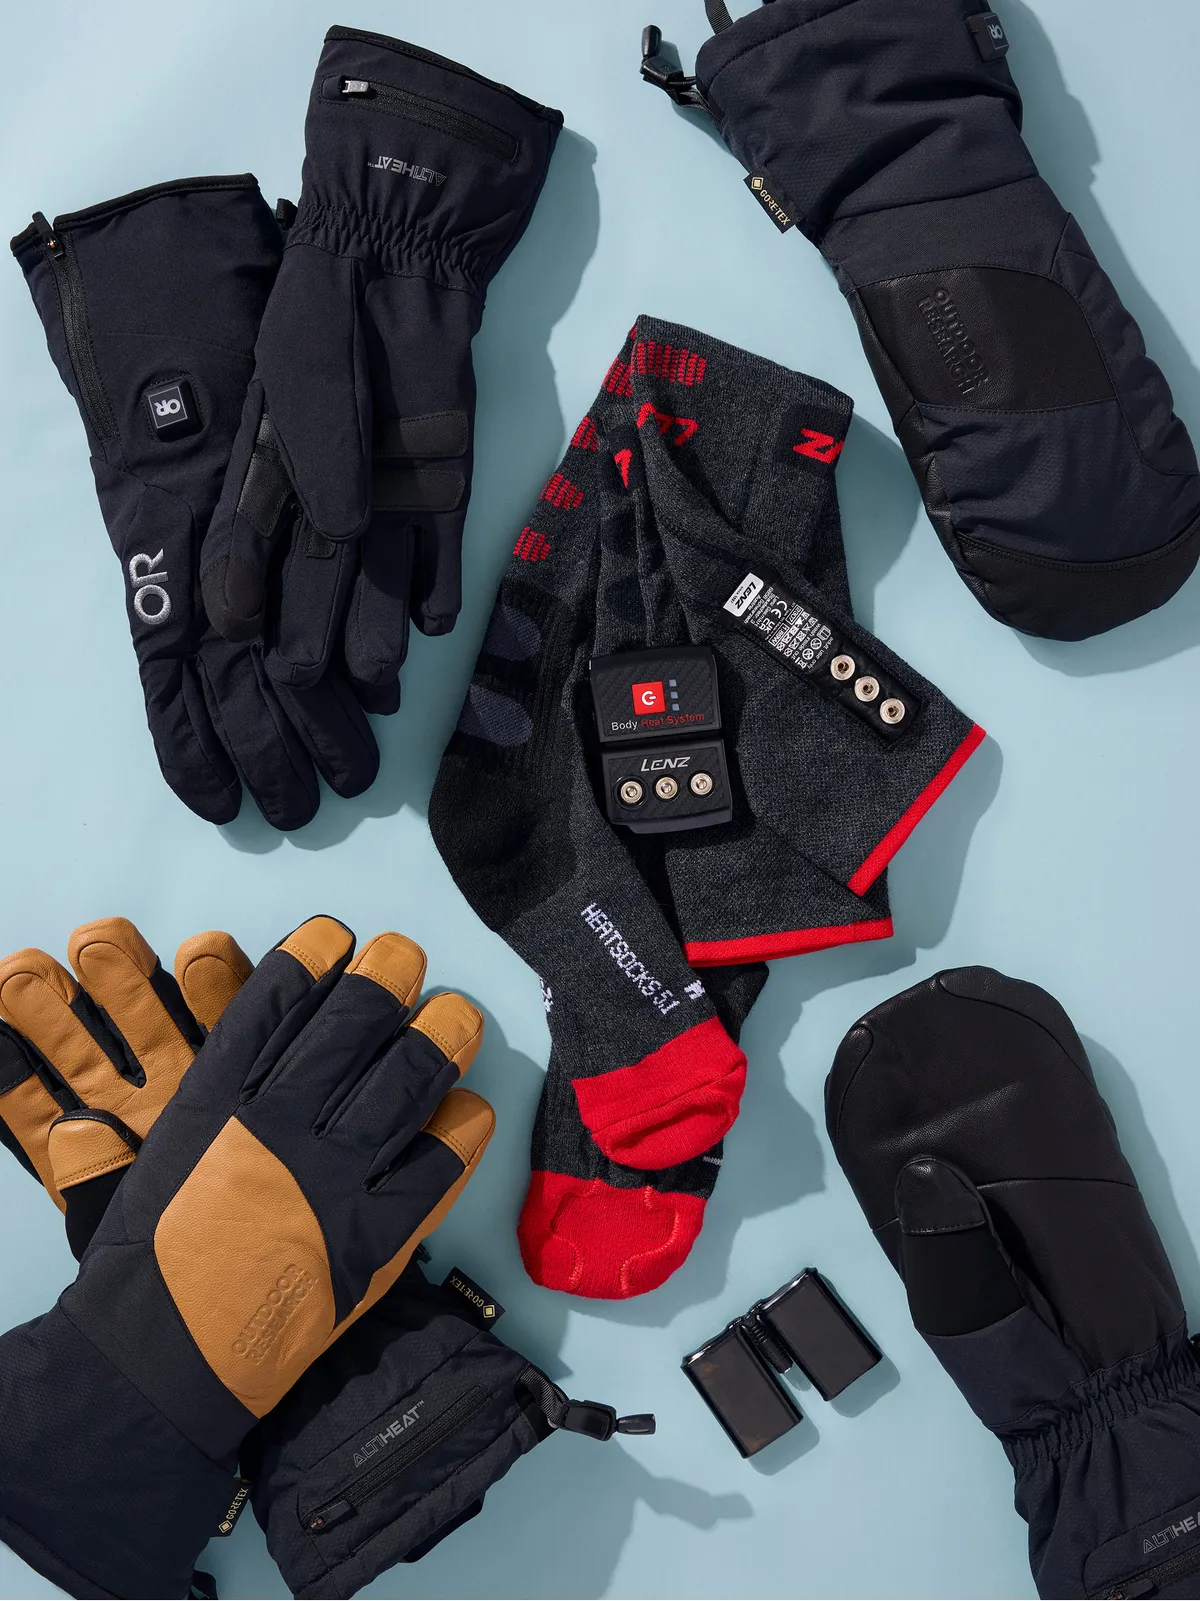
Check out this article on my favorite safety gear if you are looking for good gloves or wrist guards.
There is also a video version of this article which can be found here:
This may take some getting used to but after about a day or two it feels more natural and comfortable to operate the Digital Crown.
This is another one of my favorite Apple Watch tips! Give it a fair chance; you’ll be surprised.
The reason I like to wear my watch this way is to accommodate my riding gloves/wrist protection and also to be able to use the Digital Crown without having to fish my finger, under and behind my glove.
Check out this article on my favorite safety gear if you are looking for good gloves or wrist guards.
There is also a video version of this article which can be found here:
No comments yet…