Discover Wesley’s Cyberwheel: a Tesla Cybertruck-inspired electric unicycle built from scratch by a Tesla employee. Packed with advanced features like a custom ABS frame, high-capacity battery, automatic charging dock, waterproofing, dual dash cams, and Bluetooth speakers, it delivers both ruggedness and high-tech flair. Ride impressions confirm it’s uniquely powerful, comfortable, and a joy to experience.
Video Content
Our content may contain affiliate links. If you purchase a product using our link, we may earn a commission. This does not affect the price you pay, and we do our best to provide accurate information, regardless of affiliate status.
Written Content
Imagine if Tesla made an electric unicycle! How amazing would that be? Well, a Tesla employee already did and he’s calling his creation the Cyberwheel, inspired by the Tesla Cybertruck. I had the chance to meet Wesley and to check out his Cyberwheel during an amazing Southern California group ride. I share this adventure in this video.
Wesley (Tesla Employee) on building the Cyberwheel:
Last year around June I got a funny little idea in the back of my head… I wanted to make my own custom EUC! This idea stayed with me for months. I ate, drank and breathed it. And then the LA EUC Games came and went and the fires of my inspiration were stoked with friggin’ gasoline! I realized that it wasn’t going to go away until I executed on it, so I started jotting down everything that popped into my head.If I thought about it, I wrote it down.
I filled multiple little notebooks with sketches and notes on everything I could think of: from possible chassis designs and overall shapes, battery configurations, wheels and motors, pedals and their hangers, ride mechanics, control boards, cooling, internal wiring, chargers, power supplies, trolley handles, lights, speakers, fenders and mudguards, dash cams, stands, seats, built-in tools/supplies, waterproofing, padding and control, ergonomics, materials and durability, crash scenarios and survivability, I/O and interfacing, ease of maintenance, ability to modify and add to… The works. And then I saw a posting in the Private Sales section advertising a great-condition Gotway Monster V1 for sale near me. I jumped on it immediately and never looked back.The Foundation of the Tesla EUC
I knew that the Monster would be the perfect base on which to build my new wheel because I already owned a Monster V2 (thanks eWheels!) and loved it to death. The 22-inch tire was amazingly stable and cushion-y; it provided a wonderful ride and when combined with its 2000W-rated HB Motor, it gave me all the power I needed. The huge 84v battery (it was the 2400Wh version ) was exactly what I needed in a wheel that I wanted to be able to take me anywhere, and I could go as far as I reasonably wanted to in a single ride. I knew that one of the main things I wanted with this wheel was to have higher pedals, so I contacted @Jason McNeil at eWheels and he sent me a “lift kit” for the Monster consisting of MSX pedal hangers and all the associated hardware plus a set of Nikola pedals. And then I had to stop and think about an important detail: The control board.
***There is an entire sub-story here in which I tried to figure out how to design the wheel such that the control board could be top-mounted, rather than on one of the sides, but I ended up deciding that without having Gotway make me a custom firmware for a specially-oriented board, it would just be safer not to get TOO experimental with it. ***
The V1 board that came with the used Monster just couldn’t do justice to the motor, and the firmware, while I love it to death for what it is, just did not meet my needs. So I contacted @Jason McNeil again and got my hands on a brand-new Monster V3 control board to tinker around with!
And then I had to stop and think about an important detail: The control board.
***There is an entire sub-story here in which I tried to figure out how to design the wheel such that the control board could be top-mounted, rather than on one of the sides, but I ended up deciding that without having Gotway make me a custom firmware for a specially-oriented board, it would just be safer not to get TOO experimental with it. ***
The V1 board that came with the used Monster just couldn’t do justice to the motor, and the firmware, while I love it to death for what it is, just did not meet my needs. So I contacted @Jason McNeil again and got my hands on a brand-new Monster V3 control board to tinker around with!
 And wouldn’t you know it, this happened just after Gotway started shipping out the new MSP-style control boards! I covered some of my adventures with the new board in this thread.
The Tesla Cyberwheel Design
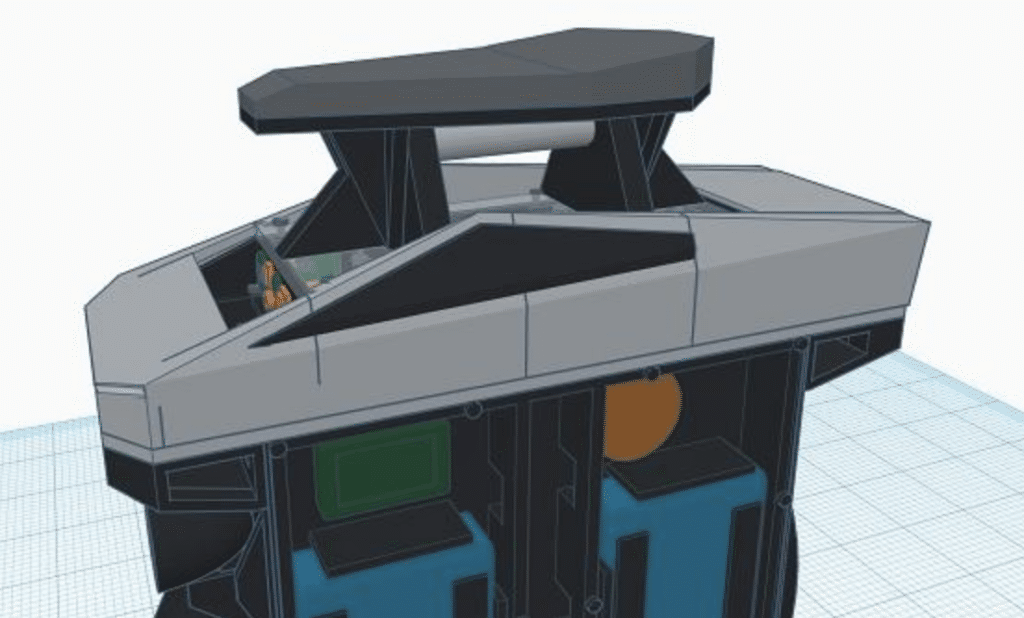
Once the Control board was decided on, I threw myself into actually designing the wheel and went through TONS of iterations trying to get everything JUST so. I used a free online CAD tool called TinkerCAD (https://www.tinkercad.com/) to make my designs, and eventually refined it down to something that I liked. And then I scrapped the design and redid it about 8 times until I ACTUALLY liked it. Here are some screenshots of it in TinkerCAD (I can provide closeups on different parts if people are interested):
 Now, there is no accounting for taste and there never will be, but BOY does the final design tickle my fancy! It has so much functionality it’s hard to list it all in one place, but I will try:
Raised pedals:
Increased ground clearance – great for off-roading and dealing with obstacles (high enough to completely ignore most curbs). Altered ride dynamics – being so much closer to the axle leads to a VERY different ride experience from a normal Monster. It is peppier and easier (less effort, but not faster…) to accelerate/brake, and corners can be taken much more sharply and without ANY fear of pedal scrape. However, your body’s slightly higher center of gravity can be a bit disconcerting until you get used to it, which can cause a bit of awkwardness when stepping on and off.Super durable frame:
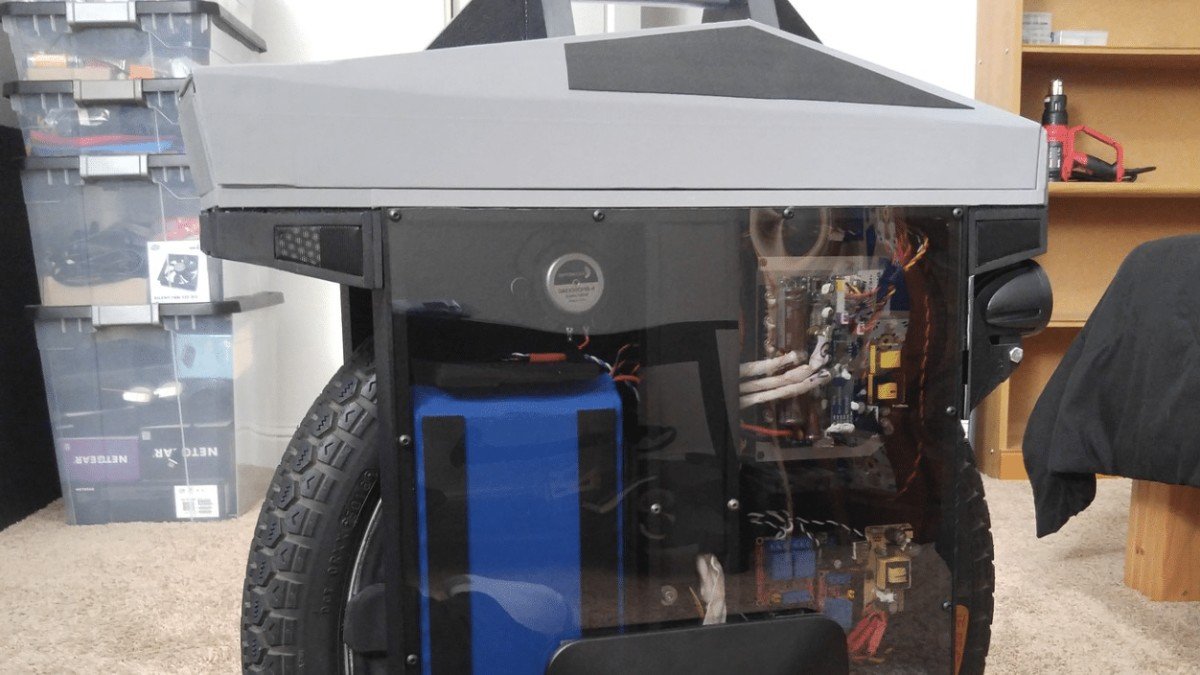
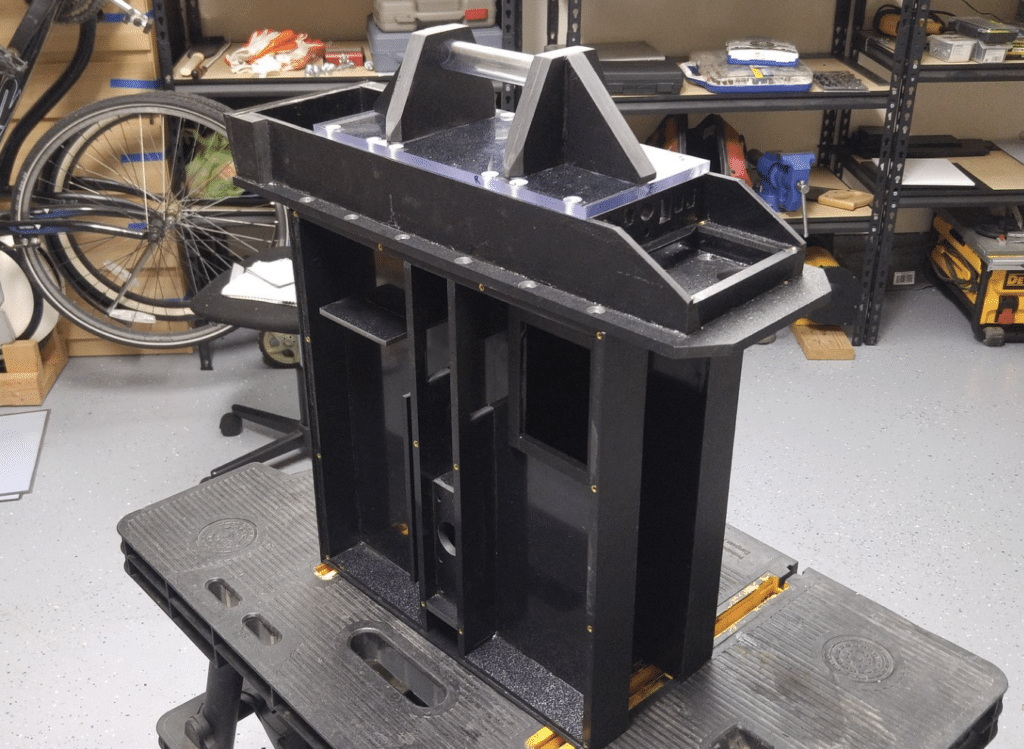
Made entirely from pieces of ABS sheet plastic chemically bonded together, the frame is extremely tough but with enough yield to prevent shattering or major cracking during a bad crash. Support lines and critical areas are made of thicker stock (1/4″ or 3/8″ material) and all mechanical connections use multiple stainless steel 20mm M6 countersunk bolts and brass threaded inserts embedded (heat) deeply in the frame material. Frame strength was verified (repeatedly) with a 4lb dead-blow mallet at multiple points and angles to simulate crash impacts. (I whacked the sucker as hard as I could and didn’t leave a scratch!)Built-in eWheels fast charger:
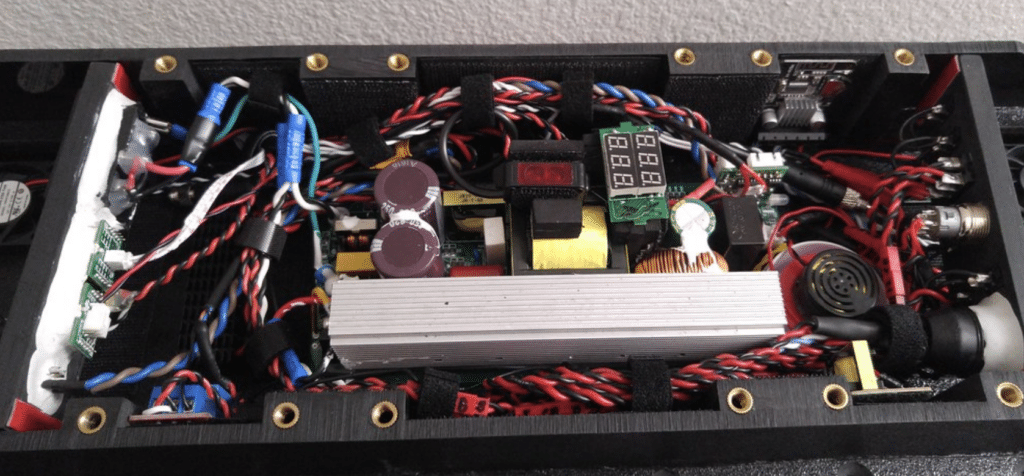
Built into the top section of the chassis, the charger provides all of the benefits we’ve come to know and love. It runs at 84v with adjustable 1A-5A charge rate and 80%-100% charge level. The electronics look great and sturdy with proper anti-vibration measures, there were multiple attachment points for the circuit board, the reliability is top-notch and the voltage and current readout just make me smile when I see it doing exactly what I want. The Charger plugs in through a standard C13/C14 plug in the “trunk” of the wheel where a 12-foot cord is also stored, allowing it to be used almost anywhere and the cable/cord replaced with a spare easily in case of emergency. The wheel also has a standard Gotway 84v plug (also located in the “trunk”) that can be used to charge the wheel in case the built-in charger becomes inoperable for some reason.
Automatic Plug-less Charging Dock:
Charging plates on the bottom of the right side of the chassis allowed me to implement Plug-less Charging when the wheel is placed on its stand. Each of the two plates has a matched pair of spring contacts on the dock that spreads the potentially high current levels between them and prevents heating at the contact point.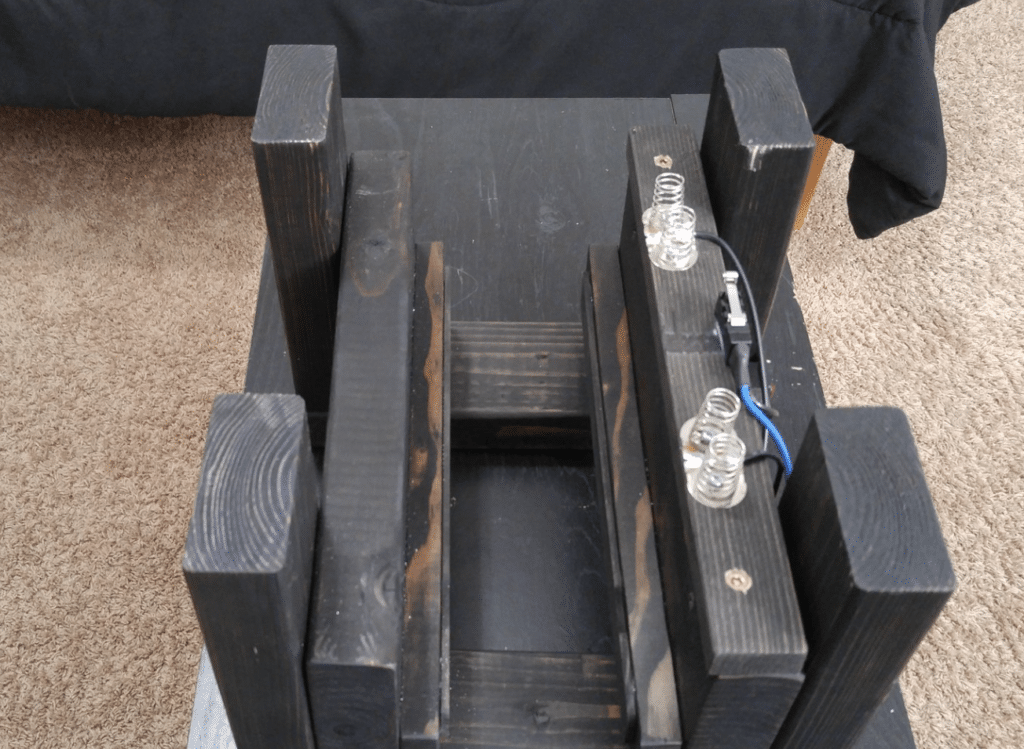 A properly-rated waterproof micro-switch keeps the spring contacts on the stand itself disconnected form A/C power until the stand is in use (until the wheel is placed on it). Because the stand is simply passing AC power to the wheel for use by the onboard fast-charger, the contact plates on the wheel itself are physically isolated (relays) from the charger circuit when not in use. This prevents a possible shock hazard by disconnecting the charge plates when the onboard charging cable is plugged into the wall.
Auxiliary 12v battery:
4 individual 12.6v battery packs connected in parallel, each with its own BMS. Cells are all older Samsung 2200mAh 18650s reused from one of my old Ninebot One E+ battery packs (all cells in good health). There is a built-in charger as well as a relay that disconnects the charger from the battery packs when it is not charging to prevent vampiric drain. This battery pack provides power to several individual systems that I wanted to be able to function without the wheel needing to be powered up: primary headlights, accent lights, bluetooth speakers and aux power.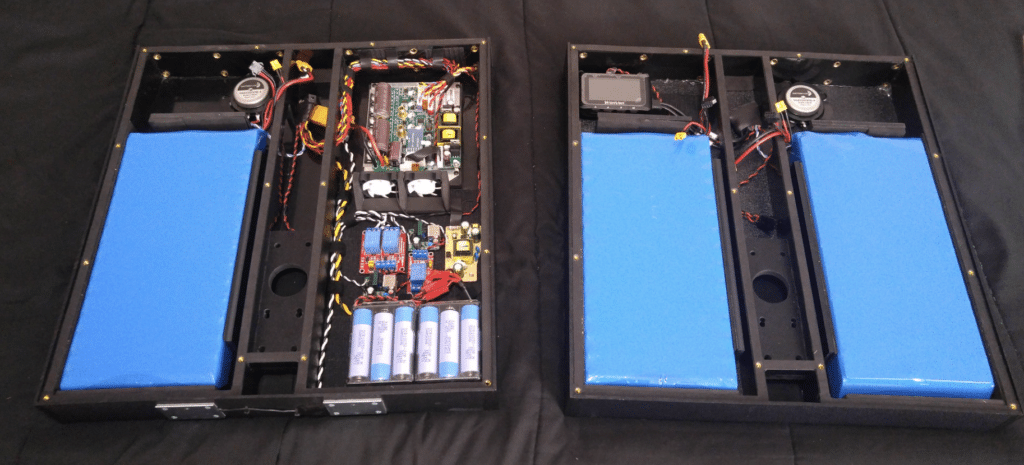 ***Feels good knowing that I have a part of my first wheel with me wherever I go on this thing!***
Automotive headlights:
2x 10w LED (Cree T6) aftermarket lights – most often used as additional headlights for motorcycles. As anyone who has experienced the new MSP headlights can tell you, these things can throw some photons! The difference here is that because of their all-metal construction they don’t require any kind of fan or active cooling, and they are both individually adjustable so I can have my light exactly where I want it and change it whenever the situation calls for it!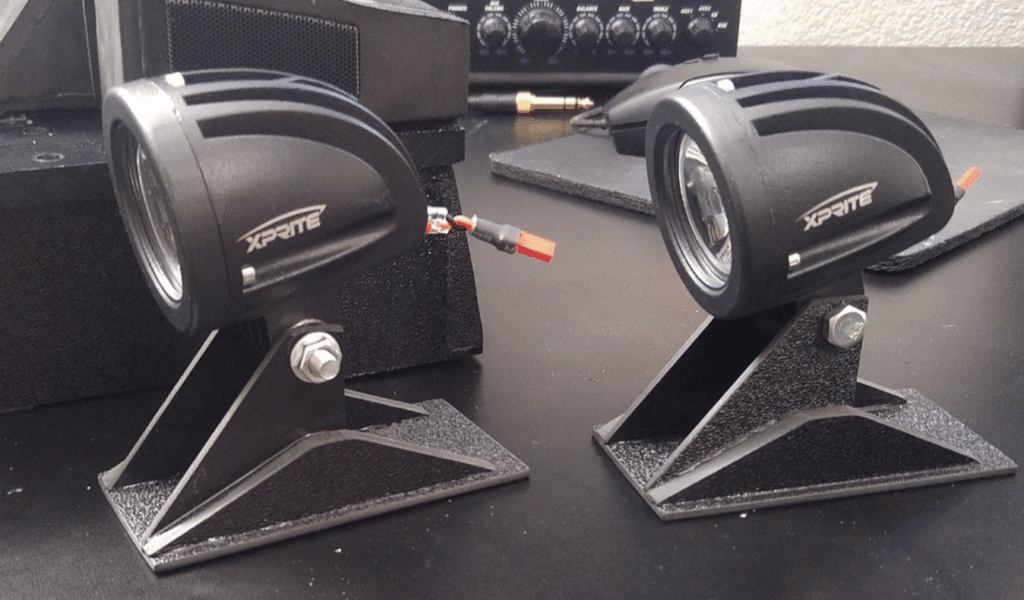 It’s wonderful being able to have one light focused right in front of me if I need it and the other aimed either WAY down the road (these things are BRIGHT), up into the trees, towards (or away from) traffic, or straight down to give myself more ground presence. Heck, I can even rotate it all the way around so it’s flush with the chassis, effectively turning one light off if I don’t need that much brightness for some reason.
EVA foam padding:
EVA foam (craft foam) is a wonderful material that I have long used on my wheel mods, and it definitely makes its presence known on this wheel. It is relatively stiff and holds its shape well, but is also pliant and forgiving. It is easily shaped and formed, can be sanded/molded/heat-formed, most adhesives bond to it without issue, and it is generally resilient and able to deal with repeated use. Aside from the ABS frame, handle and “kickstand”, the entire top section of the wheel is made from EVA foam. This means that the entire top of the wheel (including all of its possible contact points with your body) is a soft but firm “padding”.High-visibility Reflective skin:
The EVA foam used to construct and clad the different segments of the upper section was completely covered in 3M Scotchlite fabric. This is the same material used as silver striping on safety vests. It is durable, feels silky smooth, has a beautiful (subjective of course…) matte/satin appearance, and is INCREDIBLY REFLECTIVE. If this wheel is ridden at night, people WILL see it several hundred meters off, and because the reflective surface is so large and wraps completely around it, there are no “blind spots”. Also, the majority of the black plastic surfaces on the wheel have been covered in a black reflective vinyl, which behaves much like the Scotchlite fabric with a thin black overlay. It looks black in the daylight, but at night if there is a light pointed anywhere near it, it will reflect back as a bright silver/gold color depending on the color of the light.Trolley/Lift handle:
The lift handle on this wheel was designed to be just high enough off the ground as to make a trolley handle unneeded, but not so high as to make someone… uncomfortable while riding it. The handle is made of polycarbonate tube (incredibly strong) with Scotchlite fabric inside and sturdy ABS braces that are designed to easily survive a violent crash. The braces are in turn attached to a 3/8″ polycarbonate sheet that acts as a “lid” for the wheel’s upper section/compartment. This sheet allows the charger electronics to remain visible for easy inspection as well as allowing the non-contact motor cutoff switch to operate freely.Non-contact Motor Cutoff switch:
I got tired of dealing with motor cutoff switches that were unreliable or eventually failed from overuse or water/dirt/dust ingress. To solve this problem I decided to use a photoelectric switch aimed at the bottom of the handle to trigger the motor cutoff. It works fantastically! It never fails to trigger when a hand or glove is placed into the opening beneath the handle.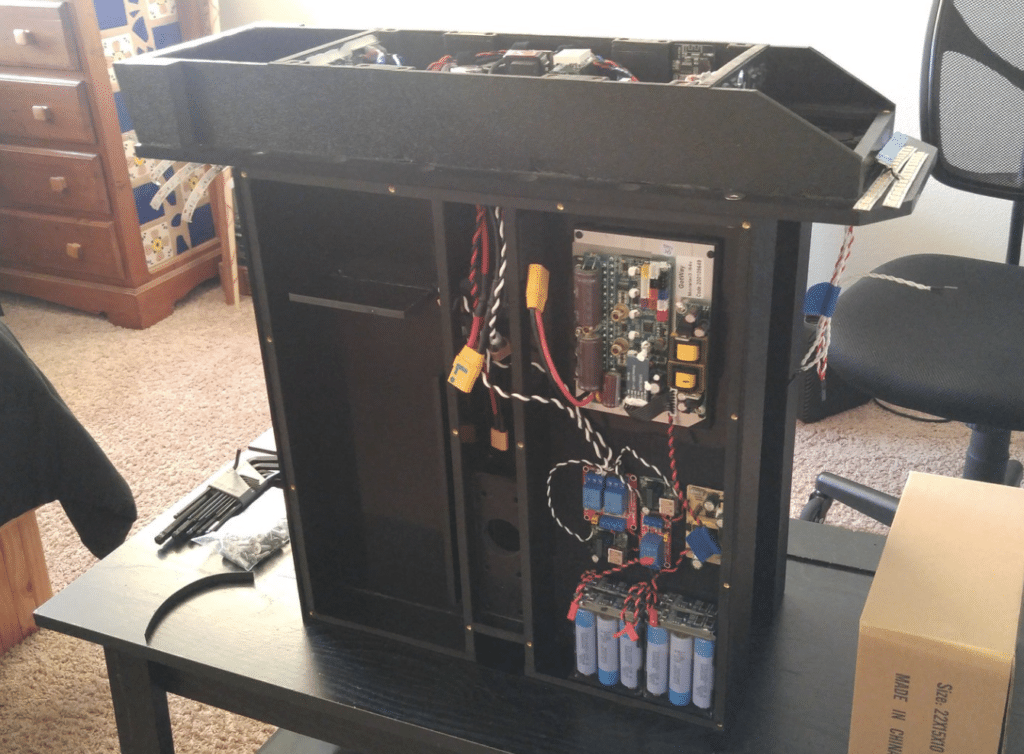
Removeable Seat attachment:
Riding seated is almost necessary for the distances that a fully-equipped Monster can take you, so of course I made a seat for this wheel! Very simple ABS construction with 1″-1.5″ of neoprene padding on top. Wonderfully comfortable and stable.Full Body Waterproofing:
I have commuted 8 miles to work on my MSuper in the pouring, drenching rain many times. It’s never much fun aside from the novelty, but the wheel always survived. However, a few times upon opening my MSuper for normal maintenance I have found evidence of water intrusion all over the batteries, cabling, and bottom of the inside of the chassis! This was chilling to me, because that could have EASILY caused a crash. For this reason, EVERY connection point on the frame and cover panels is gasketed, preventing water intrusion.Wheel covering:
I added an EVA foam “hub-cap” to both sides of the wheel. This was primarily for aesthetics, but I also realized later that it actually makes the wheel significantly more efficient in terms of air resistance – the spokes of the wheel are no longer stirring up the air as much. I also added a section of the “hub-cap” that can be lifted up (this section is held in place with copious amounts of velcro) to expose the innertube valve.Additional heatsink area:
I discovered sometime last year that a standard, cheap aftermarket M.2 heatsink (the type used on SSDs that use the M.2 form-factor) could be added to the exposed side of Gotway’s newer-generation control boards to significantly increase their surface area and cooling capacity. I have made this mod to my MSuper, my Monster V2, and now this bad boy, and it REALLY helps with control board temperatures!Neoprene Battery Cradle:
The compartments that hold the primary batteries for the wheel are surrounded by a layer of foam padding on the sides, and a much thicker layer of squishy neoprene padding on the tops, bottoms and backs that help to absorb any physical shocks encountered while riding. This takes a major strain off of the axle when you hit bumps and the like, and also serves to protect the batteries themselves.Essential tool storage:
I decided early on that I wanted an easy-to-access place built into the wheel to store whatever I might need to address issues/accidents while out in the field or away from home, just in case something burned, popped, or needed to be replaced or anything. I wanted to always be prepared and never have to even think about it, so I made sure that the “frunk” (front trunk) area was designed such that it can fit and secure the small assortment of Hex-wrenches necessary to take apart EVERY mechanical connection in the wheel, as well as a micro bicycle pump in case of minor flats.Dual dash-cams (forward and rear):
I installed a good-quality dual dash-cam setup (1 “brain” and 2 cameras) that was designed for motorcycles. The cameras are completely waterproof, and are built into the “bumpers” on the wheel – one facing forward and the other one backward. This system supports up to a 256Gb SD card, which means that when both cameras are recording at 1080p I get well over 12 hours of straight recording time! The dash cam turns on and powers off with my wheel so I never have to think about it – if I’m riding, I’m recording. It feels great knowing that if anything happens, I have proof – even if I never see it coming…Dual 40W Waterproof Bluetooth Exciters (speakers):
While I have never before felt the need to blast my music loud enough for everyone to hear it, I decided it would be kind of fun to turn up the TRON soundtrack as I’m blazing around the city at night every once in a while… To that end, I decided to attach some high-powered “exciters” to the inside of the chassis. These neat little devices use the chassis itself as the speaker diaphragm so I don’t have to break the integrity of the chassis by drilling holes for traditional speakers! And they are LOUD. I’m just using a cheap little 15-20w per channel bluetooth amplifier to drive them, but uh… you can hear me coming if I want you to Best of all, the system is controlled by an external switch and runs on the auxiliary 12v battery pack I built into it, so it only turns on when I WANT it to, not every time I turn the wheel on. Lookin’ at you, Gotway…“Kickstand”:
The rear end of the top section is designed for the wheel to rest on when it is not in use. Just tilt the wheel back until the “taillight” is resting on the ground, and the wheel will sit upright and perfectly stable.“Accent” lighting:
One of the most iconic features of the vehicle I took my inspiration from for this wheel is its distinctive headlight and taillight. I tried to recreate them with what I think is great success! I used super high-density white LED strips behind a piece of diffused plastic for the laser-like front headlight and it is incredibly bright and directional. The tail light is a more standard density red LED strip, also directed through a piece of diffused plastic and is very bright and visible. This is another system that runs off of the auxiliary battery and can be turned on without the wheel active.Undercarriage lighting:
I decided that undercarriage glow lighting might look interesting at times, so I installed a pair of waterproof 5v RGB LED strips in the “wheel well” above the wheel itself, and wired them into the control board’s headlight circuit. This gives me soft undercarriage lighting of whatever hue I want that illuminates the tire, wheel and ground below as long as the wheel is running. Makes for a cool effect!Auxiliary power port:
I am a modder, and I know that in the future I will probably have an idea that I want to implement on this wheel. To that end, I left a switch-controlled DC power plug on the wheel’s main IO panel that is connected to the auxiliary battery. It can run basically anything that takes 12v and I don’t need to worry about it being able to push enough current! If the future me requires power, he shall have it!
Conclusion:
Phew, that was a lot of stuff! And there’s a LOT more that went into the particulars of the design that helped me eliminate problems I have come up against in my other wheels and have heard other people mention about theirs. That said, I started out to write a simple post here, not a book (and I fear that has already happened…). I have already put almost 300 miles on the wheel now that I have built it and I must say that it is AMAZING! It rides like a dream. All the power of Gotway’s latest wheels with a spunkiness to it that’s all its own. Comfort, and a sensation of plantedness that I haven’t experienced before on any other wheel. It behaves and moves like a much smaller wheel thanks to the pedal placement, but doesn’t give up any of its imposing authority or stability. It feels fantastic in a way that you just have to try for yourself. Well, try and get used to, because it is a CHUNKY boy (about 80lbs worth) and has some quirks that go along with it. The inertia, center of gravity, leg contact points and how the firmware interacts with both it and you are different from anything else I’ve ridden and can take some time to acclimate to. That said, it’s my new favorite wheel, hands down. I took a bunch of pictures during the fabrication and assembly process (when I remembered…) and have posted them in several albums on Flickr. The photos don’t have captions so if you have questions feel free to ask! Here ya go! Frame Construction: https://www.flickr.com/gp/188158875@N06/9vdtgU Populating Top Compartment: https://www.flickr.com/gp/188158875@N06/84W13u Wheel Cover: https://www.flickr.com/gp/188158875@N06/9Z44wv Populating Sides and Underside: https://www.flickr.com/gp/188158875@N06/vXnX9v Front and Rear Bumpers: https://www.flickr.com/gp/188158875@N06/hk7797 Side Pads, Nose and Tail: https://www.flickr.com/gp/188158875@N06/24eq52 Frunk, Trunk and Skin: https://www.flickr.com/gp/188158875@N06/0P7A4f Primary Batteries and Wiring: https://www.flickr.com/gp/188158875@N06/jr4776 Charging Stand: https://www.flickr.com/gp/188158875@N06/549D0J Final Assembly: https://www.flickr.com/gp/188158875@N06/s3PH30 Vanity Shots: https://www.flickr.com/gp/188158875@N06/iVs4iC Special thanks to Wesley for sharing his amazing Tesla inspired electric unicycle, the Cyberwheel with me!EUC Comparison Tool
It’s easy to get overwhelmed by the EUC options, so we made an interactive EUC Comparison Tool. You can sort, filter, and include or exclude data as you see fit. We hope you find this tool helpful!
No comments yet…